ExploringWorlds > Documentation
Exploring Worlds
Exploring Worlds let you choose between sites on the Moon and Mars, show them on a table top, or place them on the floor and blow them up large and walk into and around the world.
The Basics
The following video (from version 1.0.1) should get you started.

Advanced features
And this next video (from version 1.0.1) shows how to activate the HUD to access more advanced features.
More details
Exploring Worlds has five screens and an online link. The screens are:
Main screen
Locations
Augmented Reality view
Settings
Instructions
Each screen is described below.
Main screen

The main screen is the launch screen.
From here there are several buttons. These buttons (and what they do) are:
Explore Worlds - takes you to the list of locations to explore
Settings - displays user-controlled settings such as activating the HUD controls
Instructions - displays these instructions
Online Information - opens a web browser and takes you to additional information at our web site
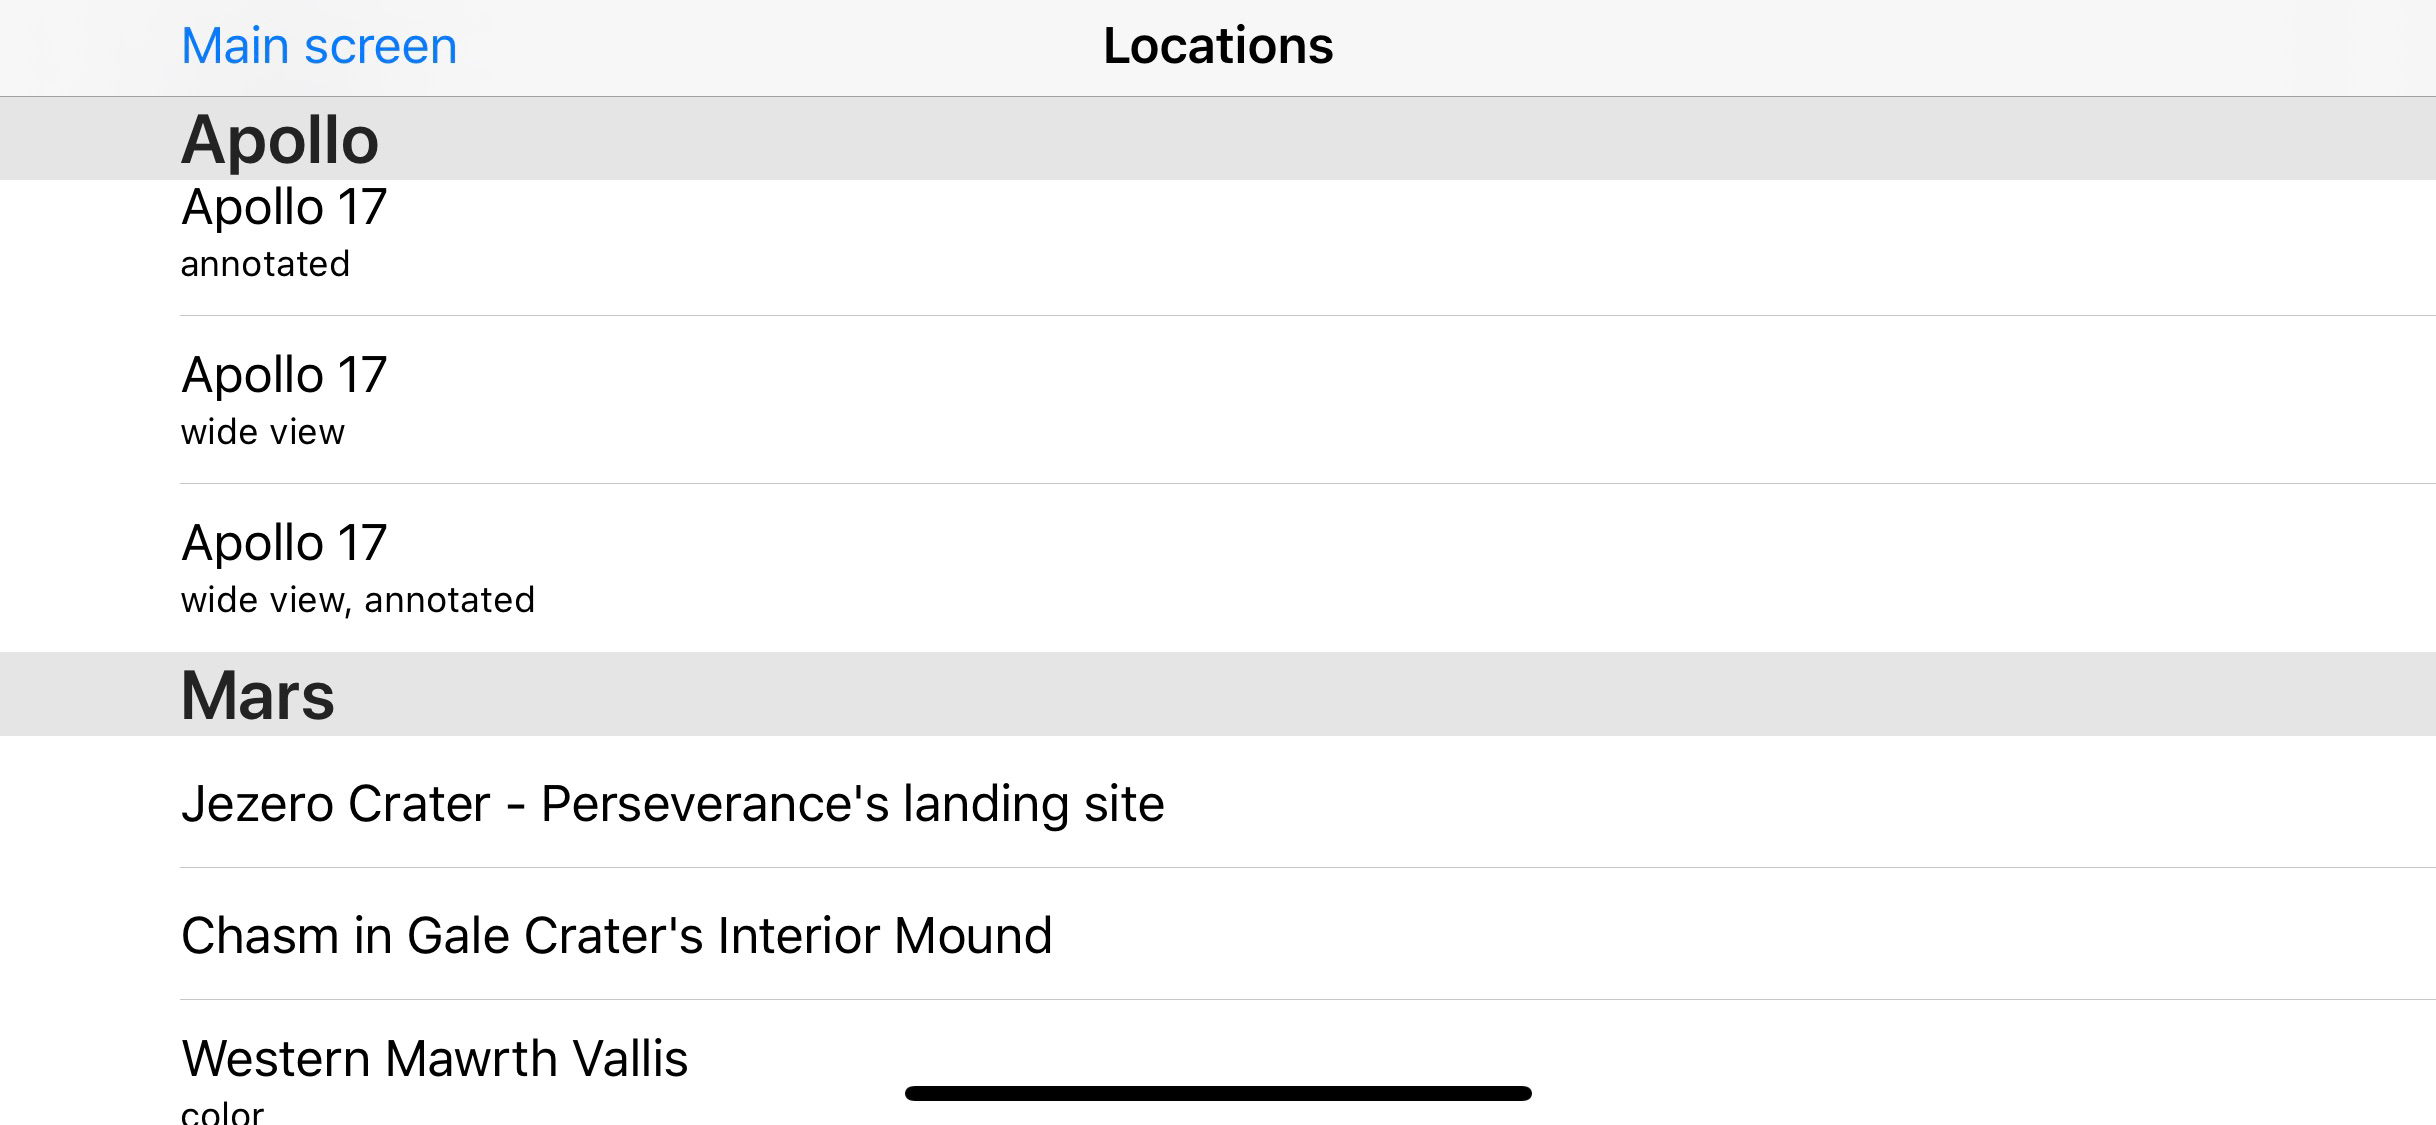
Locations
The Locations screen displays a list of worlds to explore.
The worlds are currently grouped into:
Apollo - Apollo landing sites
Mars - locations on Mars
Augmented Reality viewer

Once you select a world to view, you are taken to the Augmented Reality screen. This is where you will spend most of your time.
The view looks for a horizontal surface to place the world on.
You may need to move your phone side-to-side to help it identify a surface.
The best surfaces have a lot of texture and very little shine. For example, the viewer may have troubles identifying the surface of a shiny table top.
Once the viewer finds a surface, a green targeting circle appears. Tap anywhere on the screen, and the world will appear centered on the green targeting circle.
If you have activated the HUD in the Settings screen, you will see additional control buttons on the left and right side of the screen (see image below).
The function of these buttons are described in the “HUD controls” section below.

Settings screen

Settings let you enable or disable certain features. Currently available settings include:
Enable HUD - these are additional controls used when viewing a world.
Enable people occlusion - let people walk into your augmented reality view. Some devices do not support this feature.
Show Graphics stats - for the curious who want to see what their device is doing behind the scenes, activating this switch shows lots of details while in the AR view.
Gestures
Gestures in the Augmented Reality viewer:
Place the world - tap the screen when green target is showing
Rotate the world - two fingers rotation
Scale the world - two fingers pinch
Move the world up or down - one finger slide
Move the world horizontally - two fingers slide around the screen
Bring the controls back - if controls are hidden, tap the screen
Tap to place the world - with the green targeting circle showing, tap the screen to initially place the world.
Rotate the world - place two fingers on the screen about an inch apart and rotate your fingers clockwise or anti-clockwise.
Scale the world - place two fingers on the screen and “pinch out” to enlarge the world or “pinch in” to shrink the world.
Move the world up or down - place a single finger on the screen and move your finger up to raise the world off the ground or table, or move your finger down to lower the world.
Move the world horizontally - place two fingers on the screen and move them around to move the world horizontally.
Bring the controls back - the control button lets you hide the controls, so you can concentrate on the view. Tapping the screen brings the controls back.
HUD controls
If you activate the HUD controls in the Settings screen, five buttons appear on the left and right side of the screen. Touching a HUD button brings up several options to choose from.
If you have a smaller device like an iPhone, the list of choices will fill up the screen.
If you have a larger device like an iPad, the list of choices show as a pop-up menu next to the button.
See the “Toggle button” section below for examples of both types of lists.
Pressing the cancel button in the list selection dismisses the list without making a selection. For iPads, touching anywhere else on the screen also dismisses the list.
Each list is context sensitive. For example, once you have taken a screen shot using Record > Screenshot, the next time you select that Record button, the “Share screenshot” choice will be added.
Examples of choices for each of the HUD buttons are shown below.
Toggle button

Choices as they appear on smaller iOS devices

Choices as they appear on larger iOS devices
The Toggle button lets you turn off and on several features. These features are:
Navigation bar - turns off (and on) the bar at the top of the screen with the “Locations” back button. Turning off the Navigation bar provides more screen real-estate for the AR view. To exit the AR view, don’t forget to turn the Navigation bar back on.
Controls - turns off the HUD buttons. Turning off the HUD buttons clears the screen of the control buttons so the entire area is devoted to the AR view. This can be useful if you are recording the screen. To turn the buttons back on, tap the screen.
Background - turns off (and on) the background video of the real-world. Turning off the background can be nice if you want to take pictures or video of your screen but don’t want the real world (e.g., your house or your spouse) to appear in the images or videos.
Floor - turns off (and on) how far down the landscape can go. You can raise or lower the landscape by moving a single finger up and down the screen. Normally you cannot lower the landscape below the surface you initially tapped on to place the world (e.g., a table top or the floor). Turning off the floor lets you lower the landscape below the floor level. This is useful if you have increased the landscape’s size so it is huge (e.g., filling the entire room), and you want to be able to see over a tall part of the landscape.
Record button
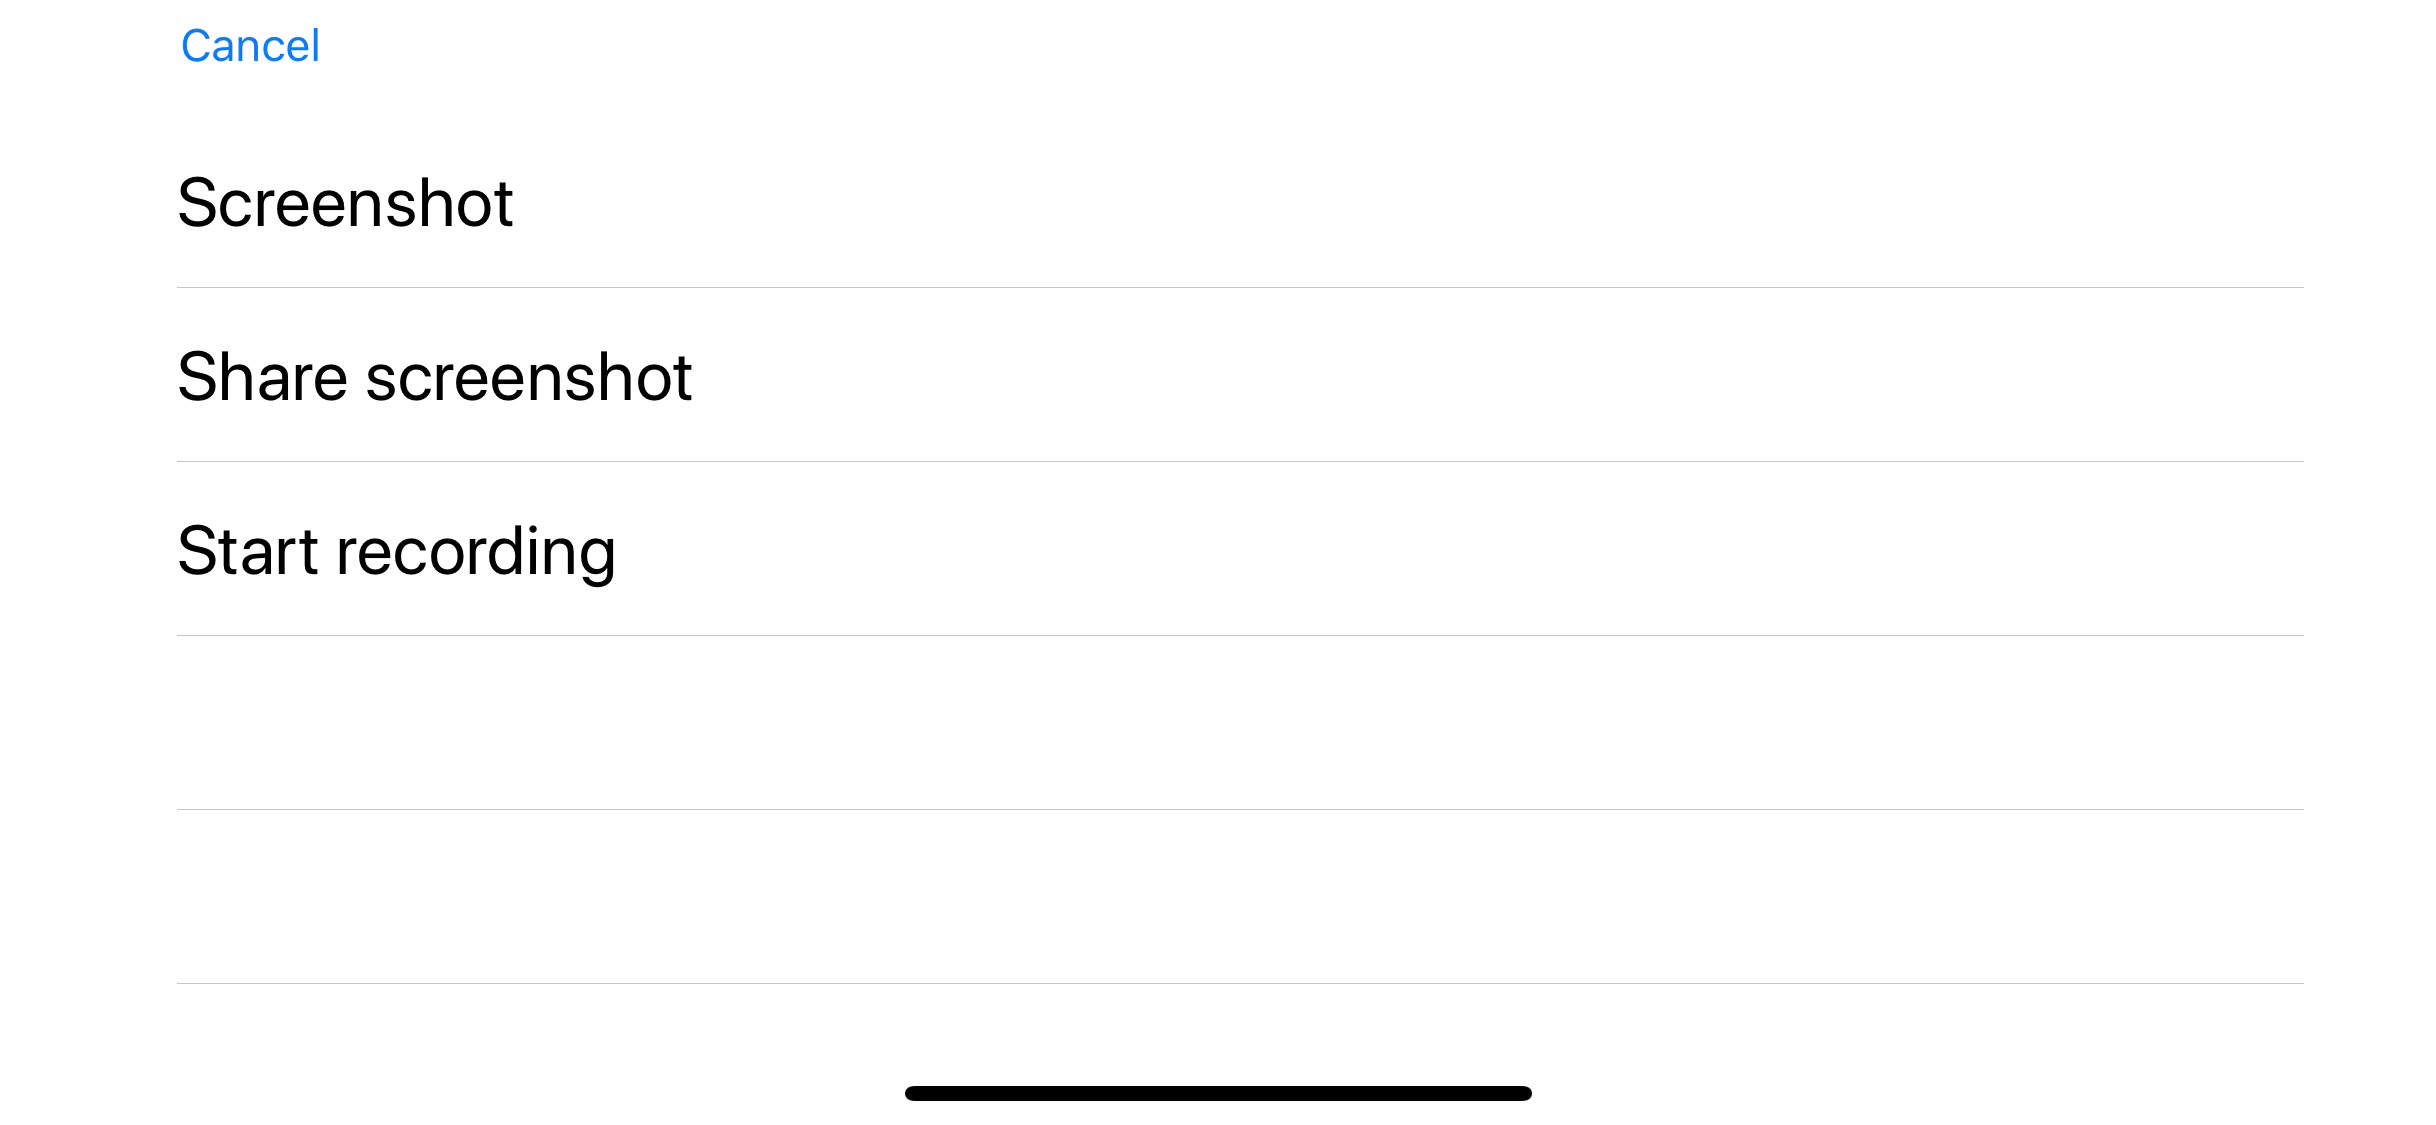
The Record button brings up a list of (up to) 3 choices to capture and share screen content. These choices are:
Screenshot - takes a screenshot of the AR content after a 3 second countdown. The HUD buttons and Navigation bar do not appear in the screenshot. The screenshot will automatically be saved to your photos album.
Share screenshot - share the most recent screenshot taken via email, messages, social media, etc. This choice does not appear until you have taken your first shot of the current AR session.
Start recording - starts recording the screen. This will record the AR content, the visible HUD buttons, and the Navigation bar. To stop recording, select the Record HUD button again and choose “Stop recording”. Your device will then present a pop-up window to let you save the video to your photo album or delete it (by choosing ‘Cancel’).
Animation button

If you have selected a scene (see “Scene button” section) that includes animation, the Animation HUD button becomes active.
The animation choices are:
Play - start playing the animation from the current location. This option is only available if the animation is at the beginning or paused somewhere in the middle of the animation.
Pause - pause the animation. This option is only available if the animation is currently playing.
Rewind - rewind the animation to the beginning. This option is only available if the animation is paused in the middle or has reached the end of the animation.
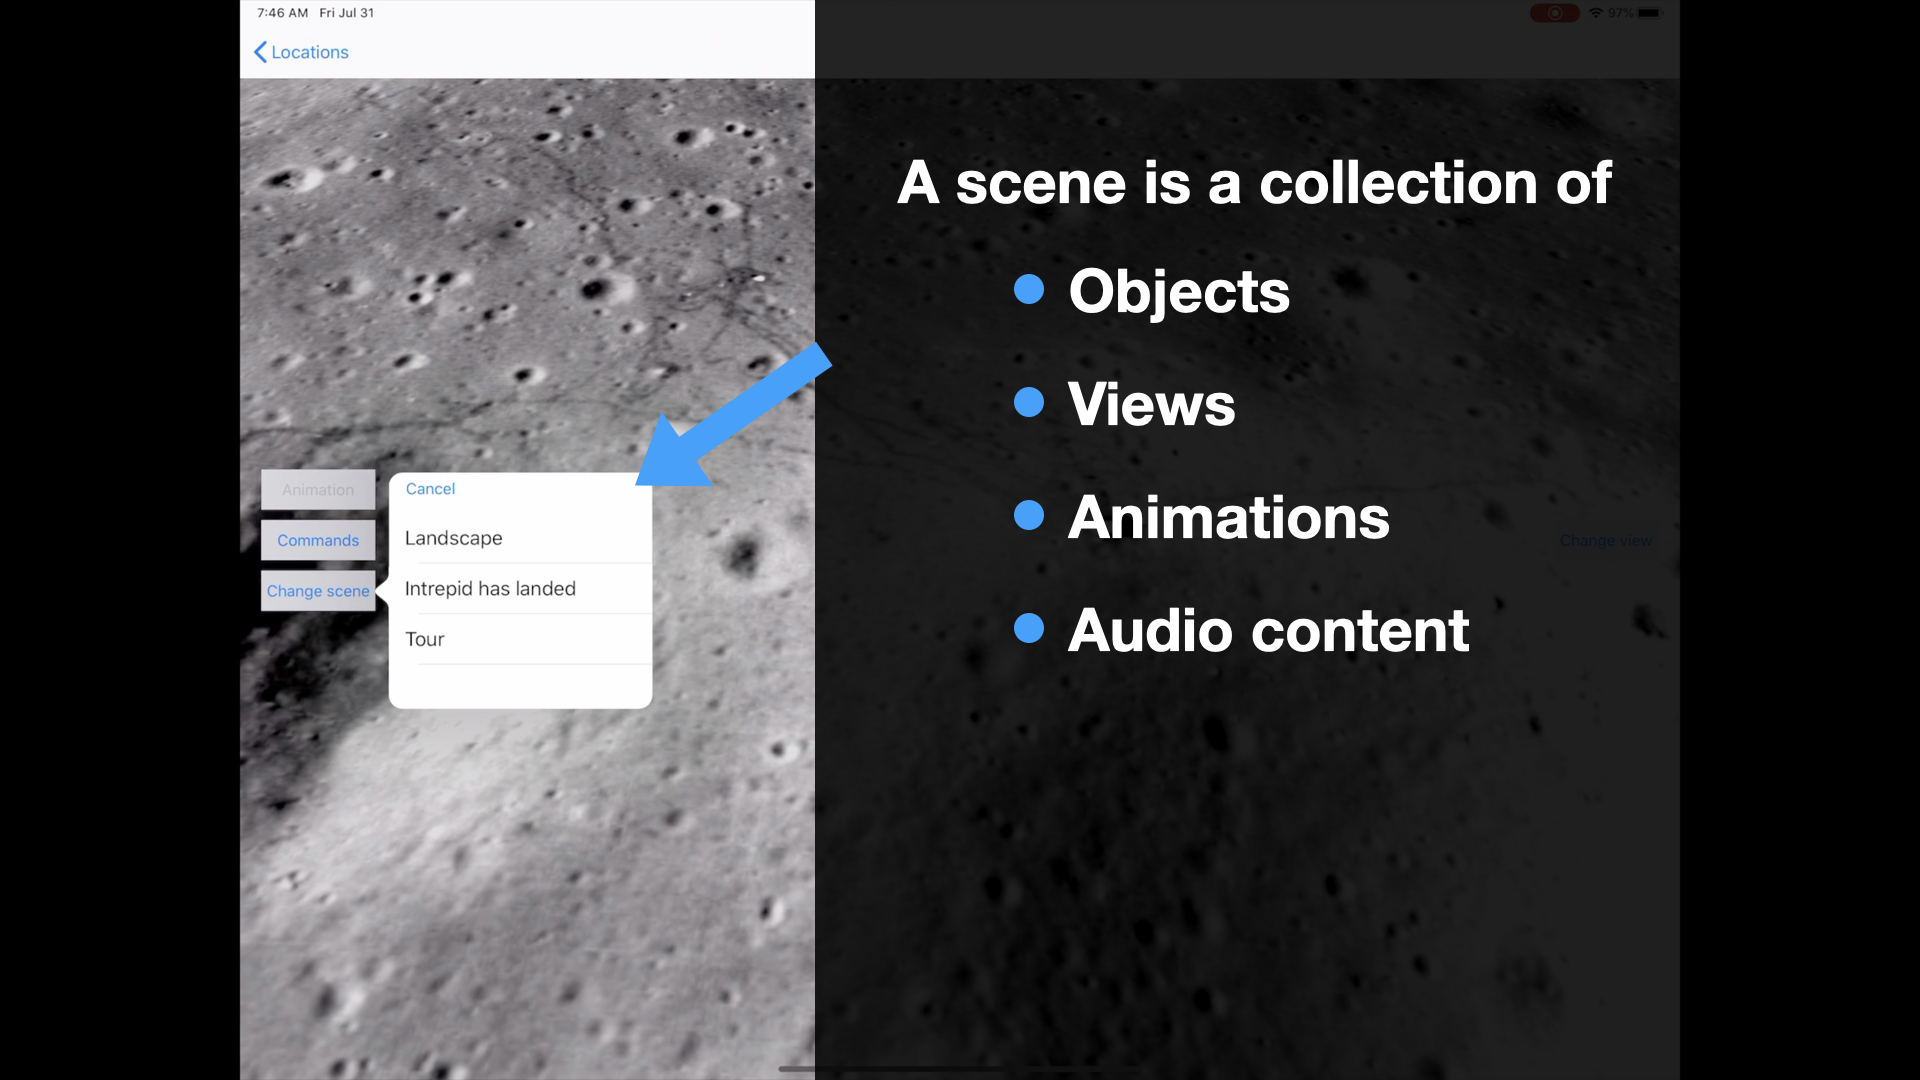
Scene button

Scene choices for Apollo 11
The Scene button lets you select a scene for the current world you are viewing.
A scene is a collection of models (e.g., Lunar lander), animations (e.g., tour ship flying around the landscape), and audio.
The “Landscape” scene is the empty scene - the world without any models, animations, or audio.
The list of scenes will vary depending on the world location you have selected.
Not all worlds have a scene besides the basic Landscape.
If you choose a scene with animation or audio, the Animation HUD button becomes active.
The example above is for the Apollo 11 landing site. In this case, there are four scenes in addition to the basic “Landscape” scene.
For Apollo 11, the scenes are:
Landscape - the default landscape-only scene.
Eagle has landed - the Eagle Lunar Lander model is added to the scene at the location it landed.
Eagle flying - the final 4 minutes and 14 seconds of Eagle’s flight and landing at Tranquility Base. After selecting this scene, the Animation HUD button will become active letting you play the animation. The flight path is our best estimate of Eagle’s path to Tranquility base. The actual NASA audio communications is synchronized with the flight.
Tour tranquility 1 - the Eagle lander and a “Tour ship” are added to the scene. The tour includes an animation, which is the tour ship flying around the scene.
Tour tranquility 2 - similar to “Tour tranquility 1”, except the tour ship takes a different path.
View button
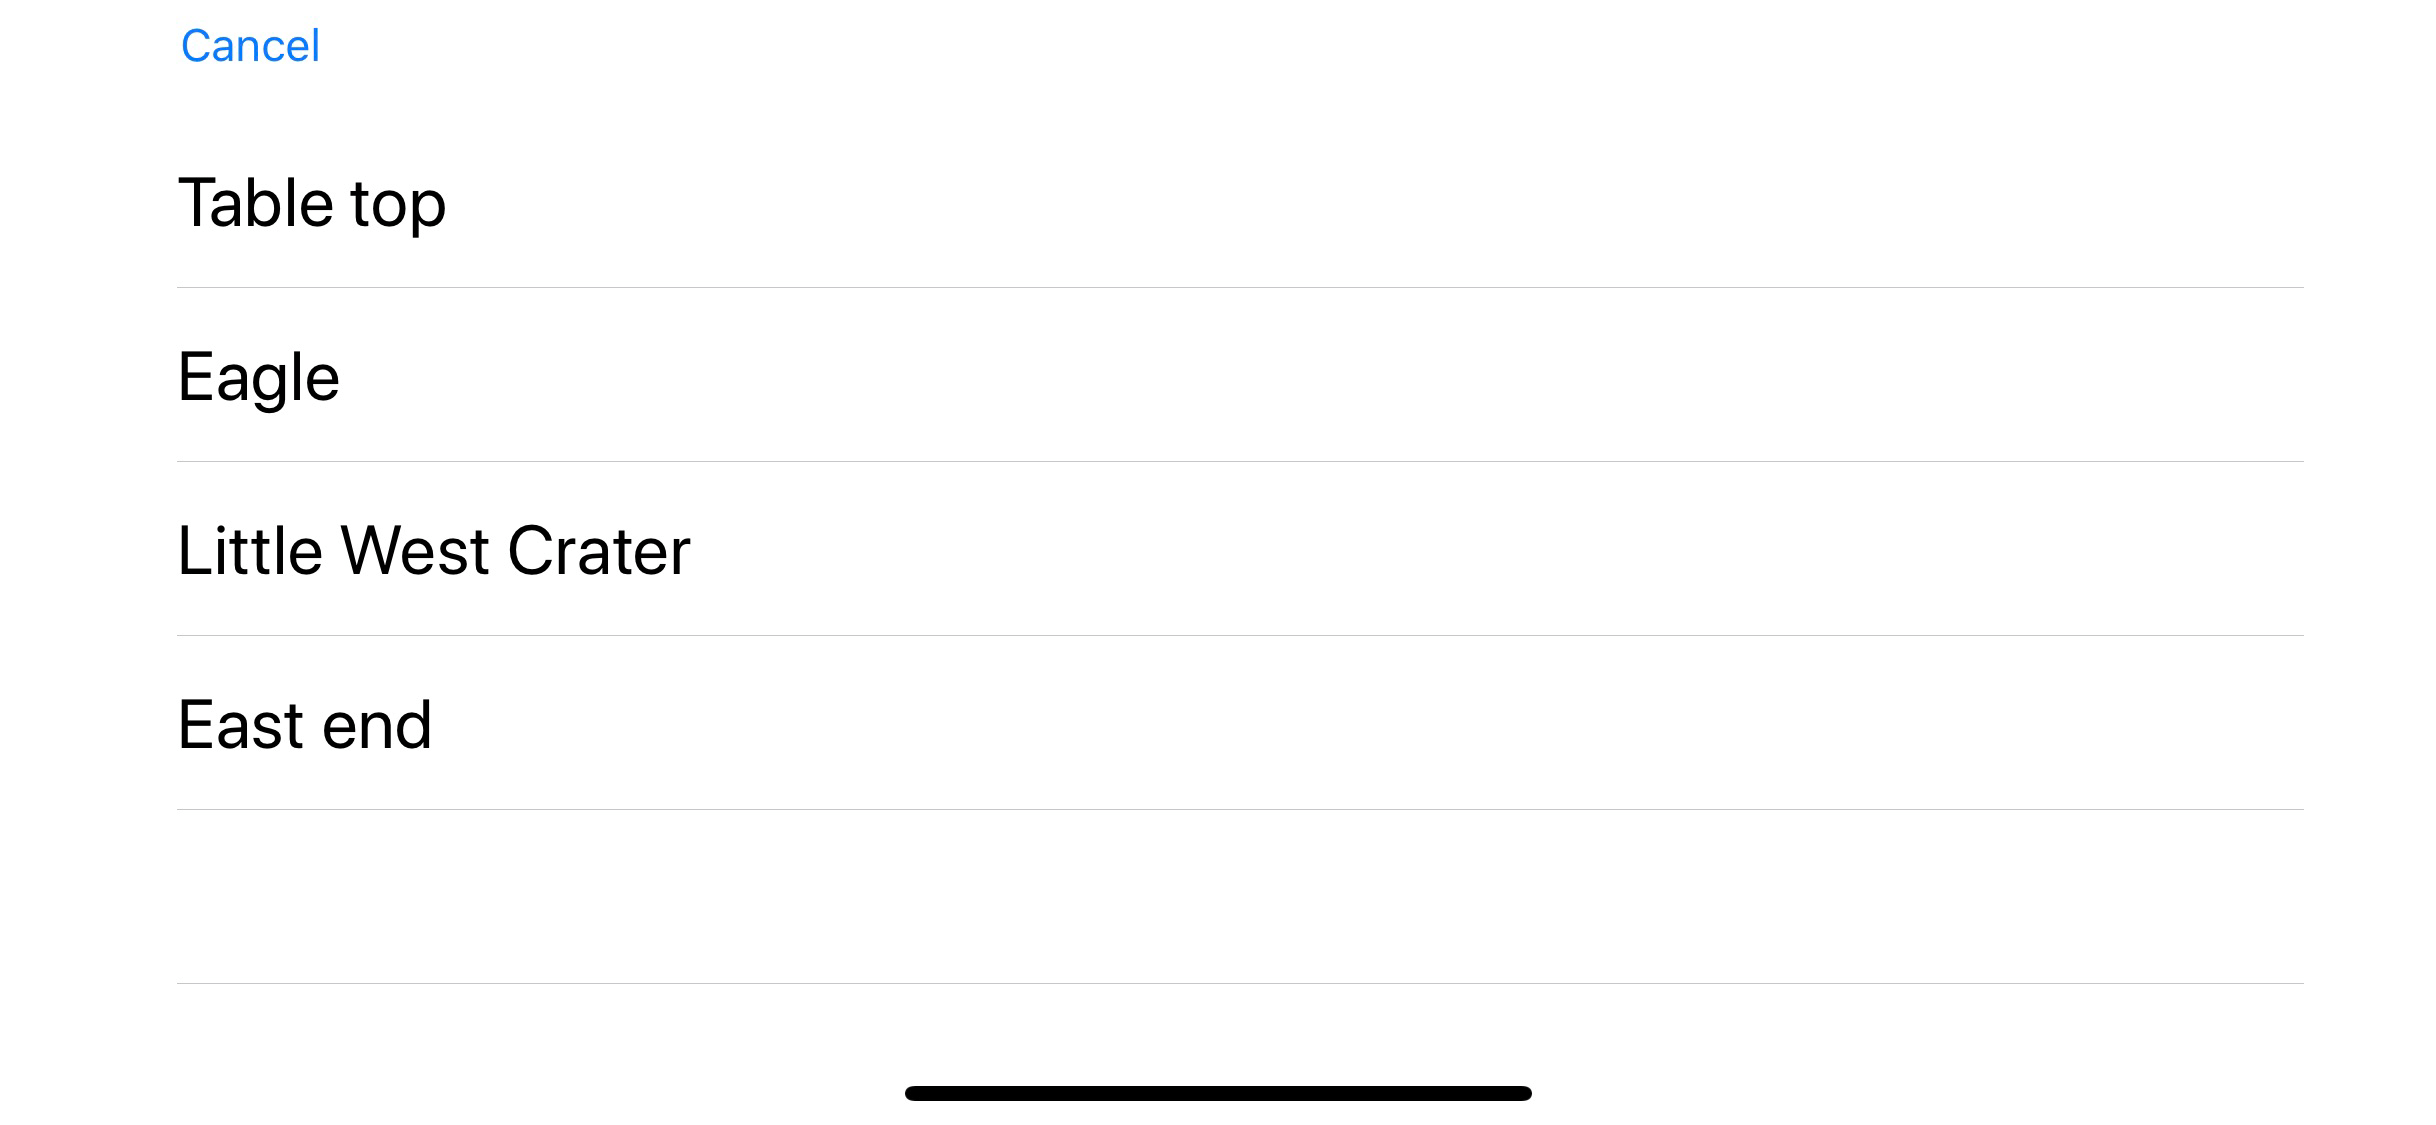
View choices for Apollo 11 tour scene
The View button lets you view the world from different locations.
All worlds include a “Table top” view. This is the default Augmented Reality view you start with when you initially place the world on a surface. It is like looking at the world sitting “on top of your table” or on the floor.
The other scenes are Virtual Reality (VR) views. Selecting a VR viewing location places you in the world.
Once in the world, you move your device around - up & down, left & right, in front of you and behind you - to look around.
Some VR viewing locations are in ships (e.g., “Tour ship”) that are animated. Once the animation starts, your virtual location moves along with the ship. This is a nice way to get a grand tour of a particular world.
Acknowledgements
We would like to thank the HiRISE and LROC teams for producing the incredible images and data sets we use in this program.
Mars images and DTM data provided by NASA/JPL/University of Arizona
https://www.uahirise.org
Moon images and DTM data provided by NASA/GSFC/Arizona State University
https://www.lroc.asu.edu
Full Moon image by Gregory H. Revera
https://commons.wikimedia.org/wiki/File:FullMoon2010.jpg
Distributed under Creative Commons Attribution-ShareAlike 3.0 Unported license.